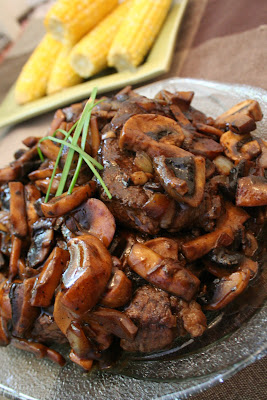
Steak with Balsamic Mushroom Sauce


I always love to find a deal on an already cheap cut of meat....but the creativity comes when figuring out how to turn that tough meat into a tender, delicious supper. This was my culinary dilemma when I found beef blade steaks for $1.50 a pound. I was pretty sure I had solved the problem with this recipe though....I mean come on....smothering the steak in a sauce made of balsamic vinegar and sauteed mushrooms? Seriously.

The sauce was just as heavenly as I thought it would be. Tart, slightly sour but full of rich body from the mushrooms and beef broth. And my cheap steak find? Horribly tough and chewy!

So here's the lesson to the story: use a quality steak when frying or grilling, and use tougher steaks like blade for stewing and slow cooking. Just because you douse a cheap steak in a delicious sauce does not make it less like a meaty bubblegum...it just makes it a tasty meaty bubblegum :)

This recipe is definitely worth making...just don't use meat as tough as rubber.


Recipe from Gourmet Magazine
__________________________________________________________________________________

Serves 4


4 steaks or 2 large steaks cut in half (about 1 1/4 lbs in total) Use whatever cut you like best
1/4 tsp salt
1/8 tsp black pepper
1 tbsp olive oil
1 tbsp butter
2 cups sliced mushrooms
1 tbsp finely chopped shallot, or 1/4 finely diced onion
1/4 cup balsamic vinegar
2 tbsp soy sauce
1/2 cup plus 2 tsp beef broth
3/4 tsp cornstarch


Heat a large frying pan over medium high heat with about a tbsp of oil until nice and hot. Put the steaks in the pan and cook about 4-6 minutes per side. This should make them about medium-rare. Remove the steaks from the pan, place on a platter and cover with aluminum foil. Sitting on the platter they will cook to medium. If you like your steaks more done than this, feel free to adjust the cooking time.

While the steaks are resting, add butter to the frying pan along with mushrooms and shallots (or onion) and saute until the mushrooms are browned and tender, about 4 minutes. Once they are done cooking, add them to the platter with the steaks.

Add the vinegar and soy sauce to the pan, making sure to scrape up the delicious browned bits on the bottom. Let cook about 2 minutes and then add broth and let simmer. While the sauce is simmering, add remaining 2 tsp of broth to a cup with the cornstarch. Stir them together and add to the pan and stir well. As it starts to simmer it will thicken up the sauce. Take the entire plate of steaks and mushrooms and return them to the pan along with any meat juices that have accumulated. Turn the steaks over in the sauce letting them get covered and delicious. Serve the steaks with the sauce and mushrooms smothered over top.

Click here for printable version of Steak with Balsamic Mushroom Sauce
__________________________________________________________________________________

THE RESULTS?
Like I said, the sauce was tasty and delectable but the meat was tough and grisly since we used blade steaks. With a nice piece of sirloin this would be an awesome summer meal best enjoyed with a cold drink on the patio ;)

Papaya Halwa


INGREDIENTS:


Raw papaya - 1
Food Color - 1/4 tsp
Sugar - 2 cup
Ghee - 4-5 tsp
cashew - 10 nos
cardamon powder- 1/2 tsp
milk - 1 cup

METHOD:


Make cashew into small pieces. Fry the cashews in ghee and keep aside.Boil the milk for 15-20 minitues in medium heat until gets thick.Heat one tbsp ghee in a pan, add the papaya pulps and fry till the smell vanishes.Cook it in medium heat and stir occasionally for 5 minutes.Now add the milk and boil it until milk evaporates,then add the food color,sugar and stir continuously in low heat.Now add the remaining ghee and stir on low heat till the mixture collects in a soft ball or the ghee oozes out.Serve with decorated cashews and cardamon powder

musings over one shtrong kaapi

Food, for me, was Tamil Brahmin cuisine for a very long time. In my family, the people who claimed that they were not very rigorous about their food preferences only meant that they even ate Bisibelebaat or Palakkad cuisine sometimes. In this milieu, I felt like a radical extremist since I enjoyed 'north Indian' food and was even willing to go without rice for a couple of meals. If you are younger than 30, I must tell you that this was a huge step for a Tam in the seventies. Of course I have written about this before.

And then I boarded a Pan Am flight in 1986 for my first ever trip abroad lasting two and a half months. Just the American accent was enough to intimidate me those days; it was worse because on this flight, for the leg till Frankfurt, the flight attendants were mostly European. They hardly smiled, spoke English like German and looked like they would throw you out of the window if they didn't like you. And it was pretty clear they didn't like anyone on this flight full of noisy, unruly Indians. Seated next to me was a couple from Gujarat . They seemed like seasoned travelers. At meal time they were served an Indian meal while everything on my plate looked unfamiliar except large leaves of cabbage (actually lettuce). I couldn't believe that this passed off as lunch in any language. I timidly requested the flight attendant for the same meal as the Gujarati couple.
'Sorry ma'm, it's all we 've got.'
My travel agent had missed to mention my meal preference!

I did not realize that this was just the beginning of the horror story until I had to suffer meal after meal of burger (with the meat removed), French fries and coleslaw on the days we traveled. I had a choice of staying in the apartment and having rice with baked beans or yoghurt or stay hungry and travel. We traveled and took pictures before every monument and tourist attraction until finally I was happy to come back home to proper meals. No wonder I only have hazy memories of that trip and don't recognize the monuments I am standing in front of.

Twenty years later I traveled again to this country and this time it was all very different. I was prepared to try exotic food ( as long as it had no meat) and they served me Pulao and Rajma for dinner and idli and upma for breakfast on a Lufthansa flight. In Seattle I stayed with my cousin who made sure that there was Sambar and curried vegetable at every meal. When we went out we ate at Udupi restaurants serving Puri/bhaji and Masala Dosa!
Thanks to the IT revolution and Y2k problem in no small measure I suppose! India had arrived - it was now a real country with real people and real food and not just some land of sadhus and snakes, where people had OM for breakfast and meditated! Airlines cared for the Indian traveler and his meal preferences. You didn't have to suffer Air India just for their food. You could buy and make Indian food right here -it was available and affordable.

But still there was one thing that I missed - Tea. Starbucks had one type of sweet tea and in the tearooms we were presented with a menu of several choices of herbal, green and black teas. While they had great snob value and assured ego-satisfaction, all I craved for was a nice Masala Chai. I was even willing to try Coffee with little luck. Yes, in the land of Starbucks we missed COFFEE - South Indian coffee. Starbucks gave us choices like we never had before and they were willing to make it all just the way we wanted. Only we didn't want any of it because they were either too strong or too watery, or too frothy or too hot. In every case it was too much - even the smallest cup ( whose idea was it to call a small cup 'tall'?) was a lot and we always ended up wasting more than half. Something was missing and it did not feel like the coffee back home even when we picked up coffee powder from the Indian shop. May be the chicory content.

How do the South Indians manage without their daily dose of South Indian Filter coffee, I wondered. My cousin did not care for coffee or tea but I am sure that is not the case with the other million or two out there. You can take a Tamilian or a Kannadiga to Starbucks but you cannot make him drink the coffee for sure? Or had they resigned to their fate, admitted defeat and prepared their palates to an acquired taste for one or other of the Starbucks coffee? Or were they getting their coffee supplies from India regularly? It was a mystery till the time I boarded the flight back to Bangalore and I made mental note to pack a few boxes of Lipton tea if I traveled to this country again.

Last month I was packing again to come to this country when my son asked me to get a coffee filter. He said he was tired of Starbucks coffee and wanted ‘our coffee’ in the mornings. So I asked him if he wanted some coffee powder too. He said “No. My friend Soundari has experimented with the coffee available here and discovered that a combination of Ethiopian Sidamo and Sumatra coffee (1:1)from Starbucks ground to a fine blend ("Turkish" grind for electric filter) tastes exactly like the coffee you get in Chennai.’
JUGAD, wow! I should have known – the true Indian spirit! I should have guessed!
And to answer your question, yes she is right. I even wrote this post while sipping on a strong cup of the blend that tastes just like the 'one shtrong filter kaapi' at my local SLV restaurant. Thank you Soundari.
So what is your favorite blend to get your coffee just the way your mom makes it?

Meal Plan Week 25


I really love the tastes of summer. Even though I have a carnivorous meat-loving husband, I seem to get away with meatless meals easier in the summer when produce is so delicious and abundant. Combine that with eating out on the patio on warm, sunset nights and I can't wipe the smile off my face. It's gonna be a great week.

Day 1: Steak with Balsamic Mushroom Sauce, Corn on the Cob & Ceasar Salad
Mmmm....anything with balsamic vinegar in it and I am hooked. This meal will be best enjoyed out on the patio.

Day 2: Thai Green Curry over Jasmine Rice
My husband loved this curry so much, I couldn't get away with not making it again this week.

Day 3: Broccoli & Cauliflower Gratin with Garden Salad & Rosemary Flatbread dipped in Balsamic Vinegar & Olive Oil
Broccoli and cauliflower have been on sale lately, so throwing them together with butter, cream and cheese makes this dish pretty hard to say no to. And maybe I'll throw in a little bacon to satisfy my husband's need for meat ;)

Day 4: Pecan Chicken over Salad with Maple BBQ Dressing
A wonderful salad that is so satisfying. I HEART the pecan chicken tenders.

Day 5: Spring Vegetable Lasagna with Garden Salad
Some of my favorite vegetables together in a lemon dill cream sauce and layered with lasagna noodles. Divine.

Day 6: Ginger Maple Glazed Chicken with Japanese Sticky Rice and Broccoli
A super easy, delicious and laid back dinner for the end of the week.


For more meal plan ideas check out my Complete List of Meal Plans or the Menu Plan Monday Links hosted at Orgjunkie.

Tawa Paneer


I had been so bored eating same type of gravies and all I thought that I have to try something different with paneer this time. Would have loved to make palak paneer but then I didnt have spinach and i was too tired with cycling and too engrossed in DMG - Abhi - Nikki Scenes that I decided to make my own tawa paneer recipe. Well I didnt even look on net for recipes nor did i check in some of the books I have. Just went through adding whatever I felt like. Result was awesome :) So here I am sharing with you my own Tawa Paneer

Tawa Paneer
Ingredients
200g Paneer Block
1 Onion
2 Tomato
4-5 Sweet Peppers
1/4 Spoon Turmeric Powder
1 Spoon Red Chilli Powder
1/4 Spoon Jeera Powder
1/4 Spoon Corriander Powder
1/4 Spoon Aamchur Powder
Salt to taste
Oil

Method
  • Cut the paneer into squared pieces, onions and tomatoes into the medium sized pieces
  • Slice the sweet peppers
  • On a tawa add some oil and shallow fry paneer pieces on high heat but till light brown in colour. Keep aside
  • In same oil add chopped onion and cook till light brown in colour. Separate from oil and keep aside
  • Cook sweet peppers in same oil and keep aside
  • In same oil, add tomato pieces and cook till almost done.
  • Add red chilli powder, turmeric powder, jeera powder, corriander powder and Aamchur Powder and saute for 2-3 minutes
  • Add paneer pieces, onion, sweet peppers and salt to taste.
  • Mix well and cook for another 4-5 minutes and serve warm

Notes
I didnt want to add any fancy items in there nor i wanted to add more spices etc to make sure it is not too spicy. Well I loved the taste as it was it had perfect combination of mild spices with the soft paneer.
I used nonstick tawa with sides to it - that helped me in managing it while mixing well :)

Sawadee Ka* - A Night of Thai Food with Friends


Dan and Lisa have been inviting Steve and I over quite often and cooking us some authentic Thai food that they learned to make while they were missionaries in Thailand. I can't tell you how obsessed I have become with Thai food. So when the suggestion came to make Thai food for Secret-Secret I jumped all over that. With apprehension. Only because I wanted to make sure I made something delicious and authentic that Dan and Lisa wouldn't turn their noses up at. Not that they ever would, I was just feeling intimidated since I knew they would make something incredible.

Luckily I got over myself and made one of my husband's favorite dishes: Thai Green Curry. It was spicy and rich and coconutty, just the way we like it. I was so happy to have found frozen kaffir lime leaves at our Asian Supermarket. It really added authenticity.


While peppers are hard to come by in Thailand I added them for color and extra flavor. A more authentic vegetable would have been Thai eggplant, but our local grocery store that usually carries them was fresh out. The bamboo shoots were crunchy and a wonderful addition to the curry.
It was served over fragrant Jasmine rice which is one of my favorite rices.


Lindsey busted out these amazingly flavorful and crispy fish cakes with cucumber/peanut relish.

I had seconds of this it was so good. The warm and crispy fish cake was complimented by the cool and crunchy cucumbers. Just lovely.


While living in Thailand, Dan and Lisa had a favorite restaurant they liked to frequent called Jumbo. They loved it so much, one of their cats is named Jumbo. One of their favorite dishes was called Ba Mee Giao Moo Dang. It's essentially a wonton soup with noodles and bits of pork. They said they used to be able to get a large bowl of this at Jumbo for just $0.60!! They have since learned to make it at home here in Canada, but it's not as cheap or quick to make. They said in Thailand when you ordered a bowl of Ba Mee Giao Moo Dang it was quickly assembled and on your table within 2 minutes. At home, it requires the preparation of about 8 or 9 different elements and becomes an all day affair. But it's sooo good and soooooo worth it!

Dan wouldn't tell us everthing that was in it (he was too busy savoring every bite), but what I do know is that the wontons are made of a pork and shrimp mixture, there was red pork (BBQ'd pork), chinese green vegetables, egg noodles, fried garlic and shrimp crisps on top.

At the table, each person doctored up the flavor by adding sugar.

Fish sauce.

Crushed peanuts.

And chili's.
The addition of these condiments was really what sent the flavor of this dish over the moon. You had to just keep adding and adjusting the flavors until you got it just how you wanted it.

Everyone's loving the Thai feast.


As a refreshing drink after supper, Joel and Lindsey brought young coconuts. Dan busted out his meat cleaver and chopped a hole in the top of it.


Add a couple of straws and you've got some refreshing coconut water to drink. Very earthy and delicious.


For dessert, Lisa made us some Mango with Sticky Rice and Coconut Milk. It may not look like much but it was SO GOOD. The ripe mango is sliced fresh and placed on top of the sticky rice and warm, sweetened coconut milk is drizzled over top. Lisa didn't have an exact recipe but I found one here.

This night was a fantastic way for me to satisfy my strong Thai cravings. Every dish was so scrumptious and you can bet there'll be more Thai food in our future.

What Thai dishes are your favorite?


*By the way, Sawadee Ka is Thai for hello.

Thai Green Curry


Thai food has become a new obsession for my husband and myself. Our foodie friends Dan & Lisa invite us over every couple of weeks for supper and usually end up cooking us scrumptious and authentic Thai food. I was craving one of the dishes they made so much that I made sure that we went to a Thai restaurant when we were in Vancouver in April. Steve ended up loving his friend Tim's green curry so much I'm pretty sure his "can I have a bite?" turned into eating the rest of the bowl.

He just about crapped his pants when I told him I was going to make it at home.


*Recipe from Rasa Malaysia by Bonbini
____________________________________________________________________

Serves 4


3/4 lb boneless skinless chicken breast or thighs, cut into bite-sized chunks
2 tbsp green curry paste (if you don't like super spicy use less curry paste)
1 can of coconut milk
1 cup bamboo shoots (these are canned and you'll find them in the International food aisle)
3 kaffir lime leaves, split and thinly sliced
1/2 red pepper, sliced
1 tsp fish sauce
1 tbsp sugar
1 tbsp vegetable oil

In a frying pan over medium heat, add the oil and curry paste and saute. Once you can really smell the curry paste and it's nice and fragrant, add about 1/2 the can of coconut milk and keep stirring until the oils in the curry paste surface. Then add the chicken and lime leaves and let cook until the chicken is almost done. Add the rest of the can of coconut milk, fish sauce, and sugar and bring to a boil. Add the bamboo shoots and red pepper and simmer for 5 minutes just until the bamboo shoots are soft but the red pepper still has a bit of a crunch. Remove from the heat.

Serve over jasmine rice.

Click here for printable version of Thai Green Curry.

____________________________________________________________________

THE RESULTS?
Spicy and incredibly delicious! My husband kept exclaiming how amazing it was and has asked me several times in the last week when I'm going to make it again. I love that it's super quick and easy to throw together yet yields such delicious results.

Hoisin & Ginger Pork Wraps with Crunchy Peanut Slaw


Oh man, oh man I totally saved the best for last! They were crunchy and sweet and savory and tangy and everyone loved every bite of these amazing wraps. While I don't often make recipes over and over again, this recipe could easily become one of the ones I do. It's extremely easy and fast to make with incredible results.

There's really not much more to say on the subject. Just make 'em!


Recipe adapted from The Kitchn
__________________________________________________________________________________

Makes 6 wraps


Hoisin-Ginger Pork:
2 cups shredded pork
1 clove garlic, minced
1-2 inches of ginger, grated
1/4 cup hoisin sauce (or more as needed to cover the pork)

In a medium saucepan, heat 2 tsp oil over medium heat. Add the garlic and ginger and stir until fragrant about 30-60 seconds. Then add the pork and hoisin sauce. Turn heat to medium-low and let simmer for about 5 minutes until heated through and all the flavors have combined.

Crunchy Peanut Slaw:
1/2 medium head green cabbage, outer leaves removed (or 1 bag of angel hair coleslaw)
3/4 cup roasted, unsalted peanuts
4 green onions, chopped
1/2 cup cilantro, chopped
1/4 cup light oil, like canola
1 1/2 tbsp rice vinegar
1/2 tbsp sugar (or more, to taste)
1/2 tbsp sesame oil
1/2 teaspoon soy sauce (or more, to taste)

6 large tortillas, white or whole wheat

Slice the cabbage as fine as you possibly can, so you have little threads of cabbage (I just bought a bag of angel hair coleslaw where this was already done for me). Toss in the peanuts, green onions, and cilantro. Place the oil, rice vinegar, sugar, sesame oil and soy sauce in a resealable jar and shake. Pour over cabbage mixture and toss until coated.

Serve the hoisin-ginger pork along with the crunchy peanut slaw with tortilla wraps. Place both inside of a tortilla and roll up.


Click here for printable version of Hoisin & Ginger Pork Wraps with Crunchy Peanut Slaw

__________________________________________________________________________________

THE RESULTS?
These were freakin' awesome! My whole family exclaimed this recipe as the favorite among the Slow Roasted Pork Challenge (which actually says a lot, since the other recipes were so yummy as well). The peanut slaw is so good it can stand alone as side dish itself....I actually made it for a family get together not too long ago and everyone loved it. All around this recipe is just fabulous.

Plan Around In-Season Produce - Summer

Lazy hot days, laying by the pool, cold drinks, BBQ's, dinner on the patio...it all means Summer is here! Living in Canada, the snow has melted, the seeds have been planted and we are able to enjoy the best growing season of the year with beautiful fruits and vegetables. The majority of our fresh fruit is grown in B.C. so fresh fruit stands pop up all over Canada with big ol' red B.C. FRUIT signs. I can't wait to start visiting the fruit stands and having veggies harvested from my Dad's garden passed along to me. What a delicious time of year to plan meals.


Information from Fruits & Veggies: More Matters

In-Season produce for Summer (June, July, August):

VEGGIES:
  • Beets
  • Bell peppers
  • Cucumbers
  • Garlic
  • Green beans
  • Radishes
  • Sweet corn
  • Summer squash
  • Tomatoes
  • Zucchini
FRUITS:
  • Blueberries
  • Cantaloupe
  • Cherries
  • Grapefruit
  • Grapes
  • Honeydew
  • Kiwi
  • Limes
  • Nectarines
  • Peaches
  • Plums
  • Raspberries
  • Strawberries
  • Watermelon

Nankhatai


ingredients
- 3/4 cup (not salted) Butter
- 1 cup Sugar
- 1 cup (refined/self rising) Maida
- 4 powdered Cardamom
How to make Nankhatai
1. Beat the butter and sugar till creamy.

2. Add the flour and cardamom powder and mix to make a soft dough.

3. Keep it in the refrigerator for 5 minutes.

4. Roll, cut into 20 equal portions. Round and keep on baking sheet.

5. Pre-heat the oven to 200 degrees. Now bake the nankhatai at 180 degree c. Look for the golden color and it's done

6. Take out the sheet and keep on the cooling rack. As the nankhatais come at room temperature take them out and enjoy them with tea or coffee or just snap it without anything.

Shakkar Para


Ingredients:

* 1 cup all purpose flour (plain flour, maida)
* 1/4 cup fine sooji (semolina flour)
* 2 tablespoons oil
* 1/2 cup water (use water as a guide line)

For syrup:

* 3/4 cup sugar
* 1/2 cup water
* 1/2 teaspoon coarsely grounded cardamom
* 3 tablespoons coconut powder

Method:

1. Mix flour, sooji, and oil in a bowl and make a stiff dough adding water slowly as needed. Knead it well. Dough also can be made using food processor.
2. Cover the dough and set aside for 15 minutes or more.
3. Divide dough in two equal parts.
4. Take each part of the dough and make a flat ball shape. Roll them into 8-inch circles and thickness of salted crackers.
5. Prick them with a fork all over the rolled dough, so the paras do not puff when frying.
6. Cut each of the rolled dough into about 1 inch square. Note: you can cut them in your desire shape.
7. Heat the oil in a frying pan on medium heat.
8. The frying pan should have at least 1 ½ inch of oil. To check if the oil is ready, just put a small piece of dough in the oil. The dough should make the oil sizzle and come up slowly.
9. Make sure to place just enough shakkar paras to cover top of the oil in frying pan. Fry the shakkar paras until both sides are a light golden-brown.
10. Let the shakkar paras comes to the room temperature and they should be crisp.

Making Sugar Syrup:

1. Put the water and sugar in a saucepan and bring to a boil on medium-high heat.
2. When the syrup comes to a boil, turn the heat down to medium and stir to dissolve the sugar.
3. Let it simmer until the syrup is about half thread consistency or 220 degrees F. on a candy thermometer. Close the heat.
4. Add coconut powder and cardamom to the syrup mix it well.
5. Put all the paras to the syrup and mix it quickly, making sure all the paras are coated with syrup.
6. Take them out on a greased tray, making sure that paras are not clumped together.
7. Allow them to cool.
8. Shakkar paras can be stored for several weeks in airtight container.

Pani Puri


Ingredients:

* Pani (Spicy Water):
* 1 cup mint leaves (Pudina)
* 2 to 4 green chilies (adjust to taste)
* 3 tablespoons tamarind paste (Imli)
* 3 tablespoons lemon juice
* 1 teaspoon black salt
* 1 teaspoon salt (adjust to taste)
* 1/4 teaspoon ginger powder
* 1/8 teaspoon asafetida (Hing)
* 1 tablespoon roasted cumin seed powder
* 1 tablespoon sugar (adjust to taste)
* 1/2 teaspoon black pepper
* 4 cups water (adjust to taste)
* Puris:
* 1/4 cup All Purpose flour (Maida or Plain Flour)
* 3/4 cup fine Sooji (Semolina Flour)
* 1/2 cup water (as needed)

Method:

1. Pani (Spicy Water):
Blend everything except the water together to make a fine paste. While blending, add water as needed to blend.
2. Taste to adjust the green chilies as they can be mild or hot. Add more lemon juice, sugar, and salt as needed to your desired taste. Remember you will be adding more water to dilute so paste should be spicier. Strain the paste using water as needed.
3. After straining mix the paste with remaining water or adjusting to the taste.
4. The pani (water) will taste best if refrigerated for a day.

Puris:

1. Mix the flour and sooji. Add water as needed to make firm dough. Knead the dough until it is pliable. Cover the dough with a damp cloth for about ten minutes.
2. Damp two kitchen towels, spread one damp towel over a cookie sheet or plain surface, close to where you are going to fry the puris.
3. Divide the dough into about 60 small balls. Keep them under a damp cloth.
4. Start rolling each ball to about a 2-inch diameter circle. Place over a damp towel and cover with another damp towel. Do this for all 60 puris. TIP: Placing the puris between damp cloths helps the puris to puff evenly on all sides.
5. Heat the oil on medium high heat. Oil should be about 1 1/2 inch high in frying pan. To test the oil, put a little piece of dough in the oil. The oil is ready if the dough comes up right away and does not change color.
6. Start frying the puris, starting first with the puri you first rolled.
7. Put one puri in the oil and press lightly. When it puffs turn over and put another puri in the oil. Keep adding six to eight puris at a time. Fry the puris until they are golden-brown all around by turning a few times. You may adjust the heat as needed while frying.
8. Take the puris out and place over paper towel, so the excess oil is absorbed. TIP: When taking the puris out of the frying pan, make sure to tilt the skimmer so that the excess oil is drained before placing on the paper towel.
9. Fry all the puris. They should be crisp and puff like a ball.

How to Serve:

Pani puris are served by making a small hole in each puri. Fill the puris with boiled and chopped potatoes, or boiled chickpeas. Finish by filling each puri with the spicy pani (water). Enjoy!

Khasta Kachori


Ingredients for crust:

* 1 cup All Purpose flour (plain flour or maida)
* 1/4 teaspoon salt
* 2 tablespoons oil
* 1/2 cup-1 tablespoon chilled water

Ingredients for filling:

* 1/4 cup yellow moong dal
* 1 teaspoon coarsely grinded fennel seeds (saunf)
* 1 teaspoon coarsely grinded coriander seeds (dhania)
* 1 teaspoon red chilly flakes
* 1/4 teaspoon ginger powder
* 1/2 teaspoon mango powder (amchoor)
* Pinch of asafetida (hing)
* 1/2 teaspoon salt (adjust to your taste)
* 1 tablespoon oil
* 2 tablespoons water
* Oil to deep fry

Method:

To make crust:

1. Mix the flour, salt and oil.
2. Add the chilled water slowly, mixing with your fingers as you pour.
3. Do not knead the dough. The dough should be soft.
4. Cover the dough and let it sit for at least fifteen minutes.

To make filling:

1. Grind the moong dal dry until it almost becomes a powder.
2. Mix 1 tablespoon of oil and dal powder in a frying pan and roast on medium heat for about two to three minutes or dal changes color lightly, stirring constantly.
3. Turn off the heat. Add all the spices and mix it well and let the mixture cool off.
4. Add two tablespoons of warm water and mix it well.
5. Let it sit for ten minutes and cover with demp cloth.

To make the Kachoris:

1. Take the dough and knead it for a few minutes.
2. Divide the dough in twelve equal parts.
3. Take one part of the dough and with your fingers flatten the edges and make into 3-inch circle. Leaving center little thicker then edges around.
4. Mold the dough into a cup and place 1 teaspoon of filling in the center. Pull the edges of the dough to wrap the dal filling. Repeat with the rest.
5. Let the filled ball sit for 3 to 4 minutes before rolling.
6. Set the kachoris on a surface with the seams facing up. Using the base of your palm, slowly flatten them into about 3 inch circle.
7. Heat about 1 1/2 inche of oil in a frying pan on medium heat. To check if oil is ready put a little piece of dough in the oil, it should sizzle and come up slow.
8. Fry them on medium-low heat. After they start to puff, slowly turn them over.
9. Fry until golden-brown on both sides. If the kachoris are fried on high heat, they will be soft and will not be crispy.

Tips:

1. Don’t roll the kachoris with a rolling pin. Rolling pins will cause the kachoris to have small holes in the dough, allowing oil to fill the kachoris.
2. Also, when using a rolling pin, the kachoris are uneven and when frying one side will be thicker than the other.

Gajar ka Halwa (Carrot Halwa)


Ingredients:

* 2 cups shredded carrots
* 2 cups milk
* 3 tablespoons unsalted butter
* 1/4 cup sugar
* 1/2 teaspoon cardamom powder
* 6 chopped roasted cashew nuts (To garnish)

Method:

1. Roast the cashew nuts and set aside for the garnish.
2. Boil the milk on medium-high heat in a non-stick pan until it is reduced to about to 1 cup. Stir often to ensure the milk does not burn in the bottom of the pan. Set aside.
3. Melt the butter in a frying pan on medium heat.
4. Add the shredded carrots and stir-fry for about seven to eight minutes.
5. Carrots should be tender and slightly changed in color.
6. Add the milk and cook until the milk dries. This will take about eight to ten minutes.
7. Next add the sugar and stir-fry for another three to four minutes until the halwa starts to leave the side of frying pan.
8. Garnish with cashew nuts.

Tips:

Gajar Halwa can be refrigerated for up to one week and kept in the freezer for up to two months. When ready to serve just warm.

Cuban Sandwiches

When researching ideas for using up roasted pork for my Slow Cooked Pork Challenge, I came across this intriguing sandwich. While the Cuban Sandwich may be well known in other parts of the world/country, in lil ol' Southern Alberta, Canada we have none too many Cuban's around. Though this sandwich may not be wildly popular in these parts, its a must that it be tried.

Two kinds of pork, one sweet one savory, gooey melted cheese and crunchy pickles sandwiched between warm and crunchy bread.....it's a fresh new take on a grilled cheese sandwich. And a fabulous way to use up those pork leftovers.

*Recipe from We Are Never Full
______________________________________________________________________

Serves 4

1 loaf of fresh soft Italian bread (or Cuban bread if you can get ahold of it....don't tell anyone that I was completely UN-authentic and bought French bread...it worked...sshhh)
1 1/2 cups leftover shredded pork
4 slices of honey ham
4 slices of swiss cheese (or enough to cover your sandwich)
1-2 deli pickles, sliced
1-2 tbsp mayonnaise
1-2 tbsp Dijon mustard

Preheat oven to 400 degrees.

Slice the bread in half lengthwise and open it up. Smear mayo on one side of the bread and on the other, smear the Dijon mustard. On top of the side with mayo, place the shredded pork, top with slices of honey ham, then swiss cheese, then pickles and place the mustarded bread on top.

Wrap the whole sandwich in tinfoil and place on a baking sheet. You want to place the heaviest oven-proof skillet you can find on top (I used my dutch oven) and place it in the oven for 20-30 minutes (it depends how crispy you want your bread to be).

Remove from oven, cut into 4 equal sandwiches and serve with a salad.

Click here for printable version of Cuban Sandwiches

____________________________________________________________________

THE RESULTS?
This was REALLY good. Both my Mother in Law, my hubs and I thought it was restaurant worthy. My husband Steve works hard all day in construction, and when he gets home he is usually so STARVING he'd eat the pan I cooked the food in. As I sliced the sandwich into 4 and there was only 3 of us, I pretty much figured he would be going back for the last sandwich. To my surprise, he was completely satisfied after only one. This is an extremely filling sandwich. So full of delicious flavor and so hearty. This is a keeper.

Slow Roasted Pork Shoulder

The best deal I have found in a long time, were these pork shoulder roasts for $1 a pound. I challenged myself to slow roast the pork shoulders in a scrumptious way, and then transform the leftover meat each day this week into a completely different meal. We begin my Slow Roasted Pork Challenge with of course....the Slow Roasted Pork. I didn't want anything boring. If the lil guy wasn't full of flavor I couldn't get my hubby to eat it. He gets totally bored by basic home cookin', so I wanted to blow this one outta the park to get him interested. Luckily Apartment Therapy The Kitchn came to the rescue with her amazing slow roasted pork recipe. Rubbed with brown sugar, smoked paprika, and cumin and simmered in beer with onions and garlic. OH. MY. GOODNESS. Seriously good eats.

*Recipe by Elizabeth P. of The Kitchn
____________________________________________________________________

Makes about 5 cups of shredded meat

4 to 5 pound pork shoulder, bone-in
1 tbsp brown sugar
2 tsp cumin
1 1/2 tsp smoked paprika
1/2 tbsp salt
1 tsp pepper
1 tbsp olive oil
1 medium yellow onions, peeled and cut into wedges
4 cloves of garlic, peeled
1 28 oz. can of diced tomatoes
1 12 oz beer (use chicken stock or water here if you prefer, but we used a brown ale and it was perfect)

Preheat oven to 325 degrees

If the pork shoulder has any thick layers of fat you want to trim that off. Mix together the cumin, paprika, brown sugar, salt and pepper and rub it all over the pork shoulder. Let it rest with the spice mixture on for about 30 minutes.

Once the pork has rested, heat up a dutch oven with the olive oil over medium high heat. Place the pork inside and brown on all sides. Once it has a nice brown crust all over, remove from the pot and add the onions, garlic, tomatoes and beer. This is the part where you scrape up all the delicious bits off the bottom. Place the pork back in the dutch oven, cover and slow roast for 3 1/2 to 4 hours until the pork is extremely tender and pulls apart with a fork.

Remove the pork roast from the dutch oven to a cutting board. Using two forks, shred the meat and place on a platter. Remove any bits of fat. Serve the pork with mashed potatoes and steamed carrots and spoon the delicious sauce over the top. You can also puree the beer/tomato/onion mixture to get rid of any big chunks...it becomes a beautiful thick gravy that is just delicious. Enjoy every bite of this incredible roast.

If you want to stretch the pork leftovers to a week of exciting meals, you'll want to roast two pork shoulders at the same time. Double the spices to cover both roasts, but nothing else. Mine didn't fit in a dutch oven, but did fit in my big roaster. When you are finished roasting the pork and have shredded it, you should have between 10-12 cups of roasted pork.

When you puree the tomato/onion/beer mixture, reserve 4 cups of it for another meal. Serve the rest of the sauce with the pork along with about 2 cups of the shredded pork. You'll need the rest of the pork for the rest of the week.

Click here for a printable version of Slow Roasted Pork Shoulder
____________________________________________________________________

THE RESULTS?
We LOVED this pork roast. The brown sugar, cumin and smoked paprika rub is awesome. The meal is so homey and wonderful, but completely full of flavor. This is a GREAT way to roast a pork shoulder. I'm so glad I doubled this recipe for the rest of the week's delicious meals.

Wow Elizabeth. Incredible recipe.


Need to use up those leftovers? Try:


This recipe is being entered into this weeks' Grocery Cart Challenge Recipe Swap.

Meal Plan Week 24 - Slow Roasted Pork Challenge


I found pork shoulder roasts on sale a couple weeks ago for $1 a pound! I challenged myself to see if I could slow roast the pork and then stretch it to last all week. BUT...the meals have to be totally different each night and taste delicious. That was my challenge, now here's the meal plan:

Day 1: Slow Roasted Pork Shoulder Roast with Mashed Potatoes and Carrots


Day 2: Cuban Sandwiches with Salad


Day 3: Salsa Verde Mexican Stew


Day 4: Hoisin & Ginger Pork Wraps with Crunchy Peanut Slaw


Day 5: Pulled Pork Sandwiches with Creamy Coleslaw


*Stay tuned this week for the recipes.

For more meal plan ideas check out my Complete List of Meal Plans or the Menu Plan Monday Links hosted at Orgjunkie.